EVA Foam Dragons - Part 1
How I make them
I have been making craft foam model dragons for a while and started showing them on the Internet. I'm still working out how to make them, each one has been different so far. Each one I make teaches me something new for the next. I have made card/paper models before and they need a lot more precision in design and crafting. These foam models were all done free hand with scissors, glue and pens. I have made templates from my dragons that you can use for your own. You can mould them to shape, trim them where necessary then colour to suit. If you don't like what you've done, put it aside and try another.

A few people have asked me how I made these. The following notes may be of help in making your own craft foam model dragons, birds or dinosaurs.
You will need the following items:
- EVA Foam. This is also known as Craft Foam and/or Funky Foam, it is about 2mm thick and available in a wide range of colours. I bought mine at Poundland. They sell packs of 10 or 15 A5 sheets in various colours. I have also got EVA foam at The Works and Hobbycraft stores. The Works sells packs of 20 A5 sheets for £2 or 50 A4 sheets for £8. Hobbycraft sell budget packs of foam and individual sheets up to A3 size in various colours.
- Household Scissors. 3 or 4 inch blades are a good size. You may also find a small pair of sharp pointed scissors useful for detail work.
- Glue. I have been using a Bostik or UHU type clear glue. You need something that will grab the foam and set fairly quickly. It helps if it's flexible and gives you a little time to adjust its position. Try to avoid anything too fumey, you will be working fairly close with these and don't need to get high off them!
- A range of coloured felt tip pens. Permanent markers like Sharpies are good for these. I also have some Letratone markers which have a great range of colours including some subtle shades. Metallic gel pens are handy for highlights or if you want to gild your dragon. You can use watercolour markers too. Watercolours work well for transparent colours but take a long time to dry on foam, so need fixing with a good spray of extra-strong hold hair lacquer. You might also need some fineline pens to sketch in details.
- Clothes pegs can be useful for holding stuff together while the glue dries.
- It's also useful to keep some scrap paper handy for sketching out your ideas before you start on the foam. Keep your foam offcuts for testing colours or making small parts, packing etc.
First of all you need to decide what sort of model you want to make. If you want to model a dragon from a film or game, try to use reference pictures. I have a RSPCA bird guide that I used for the Gannet model. It's a good idea to work out where the bones should go as they pretty much define the wing shape.
Generally I prefer to start with a lighter base colour for the foam. The red Dragon used pink and the Roc used white. The spotted copper dragon used a pale turquoise that looked awful while I was making it but took colours very well. The large green dragon started with a yellow sheet and Errol the swamp dragon was made from orange foam. Always test your colours on scraps or offcuts of foam to see how they will work before you colour your model.
Each of these was made from a single sheet of craft foam. I fold a sheet in half then cut out the silhouette of the body, tail and wings as one piece using scissors. Most of mine so far have been made from a single sheet of A5 foam. These give a wingspan about 6-8 inches. An A4 size sheet will give your model up to 11 inches wingspan.
I fold a sheet of foam in half and cut the shape freehand with household scissors. By cutting both halves together, you should get a rough symmetry. Unfold the sheet and both halves should be similar. I tidy the silhouette where necessary, trimming off any odd bits.
I have prepared templates from my models. You are free to print these off and use them yourself. You can mix and match wings tails and bodies to get the model you want, or create something entirely your own. Once the glue has dried I usually trim any rough bits.
All these models also have another foam shape on their undersides. The red dragon has front and rear legs with hooked talons, the proto-bird has a spoon shaped belly piece. The shape is fairly simple and EVA foam tends to form smooth curves rather than folds or creases so you can mould it as the glue dries. Gluing these to the upper body helps keep it all in shape. On the dragons I stuck both sides of the neck and tail together inside.
I have prepared templates from my models. You are free to print these off and use them yourself. You can mix and match wings tails and bodies to get the model you want, or create something entirely your own. Once the glue has dried I usually trim any rough bits.
 |
| Small red dragon template |
 |
| Spoted Copper template |
 |
| Proto-bird template |
The heads are separate pieces. I start with a broad triangle about an inch long, fold it in half and trim it to shape. You can use scraps of foam to bulk out the head. The Dragon's head is glued at the nose then glued where it wraps around the neck. On the proto-bird I made a small cut over each eyebrow, this gives it a slight bulge on the forehead. The beak and crest were glued together then trimmed again, then the head was glued over the neck. For each of these I had at least two attempts at the heads. The first roughed out scale and proportions, the second was usually larger and based on the first.
I still have not got the undercarriage right on these. At some point I need to give them legs!
Colouring
On some of the Dragons I drew in a lot of the detail with a fine line pen before colouring.
On the proto-bird there was just a little pen detailing on the head around the eyes and beak. I have a RSPB book of birds which I referred to while colouring the feather pattern on the proto-bird.
The colouring is all done with felt-tip pens. I used water colours on the red dragon which took ages to dry. Two days later it was still shedding colour so I fixed it with a spray of hair lacquer.
I have some Letratone markers that I used on the Proto-Bird. They give me more subtle colours. On the other beasties I mostly used cheap Sharpie copies from the pound shop.
Colouring always start with the lightest colours and layer up with increasingly darker colours i.e. yellow, orange, pink, red, brown, purple.
Depending on the sort of pens you use, you may find colours blending as you work. When you get it right, this can be very effective!
The eyes are really very simple. I draw a horizontal line for the eyebrow in a darker flesh colour then drop a short black vertical for the iris. I've used this on 15mm figures and up.
On the dragons their faces are big enough to pick out more detail, so I colour the eyeball with metallic and give them a bit of mascara with a fine pen just to define the shape.
It's handy to practice on a bit of scrap to get the look right before you touch the figure!
Next time I will try and take more pictures as I work.
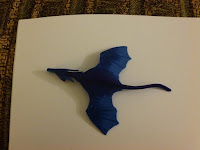 Colouring Little Blue
These are all coloured with permanent marker felt tips, sharpies or similar.
I usually start with the wing bones to give it some structure, if the model has a head(!) I draw in the eyes too.
I have also coloured his back and spine in a darker blue.

I try to get a pallet of useful colours and test them out on a bit of scrap foam before applying them to the model. Here I have added some shading between the models wing bones and along the side of its body.
There's a bit more colour on his head now.
I usually try to work from nose to tail working in short brush strokes.

Here I have added some green into his wing webbing and reinforced his wing bones with a darker colour.
It looks a bit rough here, but as you add more colours it blends and builds up a fibre texture.
Always try to work with the 'grain'. (Unless you are adding bands of pigment) you don't want lines going across the wings. The fibres should run along the spars.
I used a yellow sharpie on his wings. The colour doesn't really show as it's better on a light background but it adds a translucent sheen to his wings.
Also, the spirit in the ink thins and blends some of the colours already applied creating a wash.
When I was happy with his main wing and body colours I started with metallic highlighters.
Here you pick out detail, but try not to be too heavy handed!
Just go for it. Please share when you make yours.
Get your kids to help too, this stuff is child friendly if you use the right glue.
Chris Nicole - 14th March 2015
Making the Large Red Dragon


On the underside, you can see the belly shape and how the upper body and tail wrap around it.

The neck is glued over the shoulders and neck opening around the pencil. Then this can be glued and shaped before the head is attached.
Colouring the large red dragon - 6th May 2015
I have now found the making of photos and posted them here:
Chris Nicole - 24 June 2021
No comments:
Post a Comment